Bombono DVD Guide
Tabla de Contenidos
Managing Sources
First of all you need to add media files to the project. Media files are:
- Video you want to be on DVD.
- Pictures to be backgrounds for menus.
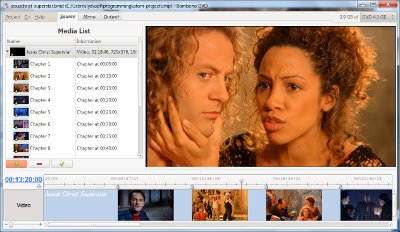
Open the Source tab (see the picture). Here you see File Browser (where you get your files from), Media List (where you put your files to), Monitor and Timeline window. Add media files with:
Plus-button from File browser
- Using Drag-n-Drop from File browser
- Using Drag-n-Drop from any file manager like Nautilus
If you want to import video from DVD see Importing Video From DVD
If your video is not DVD-compatible then it'll be transcoded just before authoring.1 Such a video is to have the emblem  . You can adjust bitrate by clicking right mouse button on a video and selecting Bitrate Calculator.2 3
Now your Media List is not empty. Here you can:
- Reorder your media with dnd
- View video by pressing "Make Chapters for Video" button (with Monitor and Timeline), the third button in the row
- Rename media by clicking on its name (virtually, not the file)
Remove media from Media List with minus-button
At right-top corner you find DVD Usage Indicator. It sums all sizes of all video you have in Media List and gets red when you overload the project (4.3 GB, 1.4 GB or 7.9 GB).
Now, if all you need is to put several video on DVD (no chapters, no fancy menus) then skip to Final: Creating DVD.
Chapters
For video, you can create chapters, which can be linked to from menus or jumped to with Previous/Forward button while playing DVD. To make chapters:
- Load the video with Edit button
- Navigate to the place you need a chapter, at Timeline
Click right mouse button and choose Add Chapter
Also, you can save screenshots, zoom time scale up to frame level.
Making a Menu
Now you have some videos in Media List. Here we make one navigation menu for them: when one inserts the DVD he (she) sees this menu and can choose what video to play first.
Go to the Menu tab. Here you see Menu List, well known Media List and Menu Editor. Create new menu by pressing plus-button, then edit it in Menu Editor by pressing Edit button. (By the way, you can create as many menus as you can - manage Menu List just like you did Media List.) Just after that you see the name "Menu 1" above the editor - that's the sign what menu is being edited now.
So, go on with menu editing. Right-click on Editor and choose:
Set Background Color if you want to fill it with a solid color (red, blue, ...)
Any item (video, picture) from Set Poster submenu,- and that item will fill the menu background (that's why you have pictures in Media List)
Ok, let's add menu items on our menu. Menu items can be as thumbnails or textual. You can add thumbnail item these ways:
- Use Drag-N-Drop from Media List or even Menu List to any area of Editor
Use plus-button at Editor Toolbar
And you can add textual item so:
- Switch to Text tool
- Click anywhere on Editor and type item text
- Switch to Selection Tool if you need no more text items
Use Editor Toolbar to change thumbnail form and text look (font, size, style and color).
So, you have some menu items on your menu. You can adjust them as you can (zoom, move, delete) by selecting them with left mouse click (multiple selection with Ctrl) and you can change where they link to by right mouse click & navigating submenu Link.
Ok, now manage your menu items so any video is accessible from menu and you are done. You are ready to author DVD (and burn it if you want).
Remark: if you have several menus the first menu will be automatically First Play menu. You can change that by pressing Ctrl+E in the Menu List (or in Media List). Now you can see First Play sign on that item.
Motion Menus
Motion menus can be rendered: to set a menu as a motion one just right-click it in Menu Browser and choose Menu Settings; set "motion" flag, duration, etc. Background and frame items (everything) will be motion if they can; use Set Poster feature to adjust it your own way.
Final: Creating DVD
Go to the Output tab. First of all, set up Output Folder. That folder needs to be empty and has enough space (as DVD Usage Indicator shows at top-right). If it's not empty you will be warned. Then choose Author Mode - leave it as "Write DVD Folder".
So, press that large button Build DVD-Video and the process is beginning. After some time (depends on data size, Author Mode), if all is ok, we see message box suggesting us:
Play in Totem - to check what we have got with Totem player (if you have it installed)
Burn to DVD - to burn; that message box is not modal, so you can choose burning options comfortably before(DVD Drive, Writing Speed and disc label) 4
Ok - just close the box; however, don't close the box if you need to burn DVD, otherwise you'll have to do the authoring process from beginning.
After you're done remove the output folder (e.g., with Nautilus) if there's no need for it.
That's all, happy authoring! ![]()
Remark: if you need to see what's going on under the hood then check Rendering only mode; make the authoring and go to the output folder. There you find:
SConscript - the script to automate authoring operations
DVDAuthor.xml - dvdauthor' configuration file (the heart of authoring); tune it if you need to make some unusual tasks
Now, from the command line you can make just authoring (run 'scons') or burn DVD (run 'scons burn').
See also
Additional options for ffmpeg can be added in the file ~/.config/bombono-dvd/ffmpeg_options (1)
Transcoding is supported in the version 1.0 or higher (2)
Read more about alternative ways to convert videos (3)
If you are about to create Double Layer DVD you may choose ImgBurn utility for final burning because it is able to calculate the layer break (it is important for rather old DVD drives only, don't care otherwise). See the guide for details. (4)


